
How to Clean an Electric Dab Rig: Chamber, Glass & Routine Care
For adults of legal age only. A clean electric dab rig is easier to inspect, produces more consistent airflow and places less residue around seals and the heating chamber. Cleaning is not one universal process: glass, ceramic, quartz, silicone and electronics tolerate different treatment. The device manual always overrides a general guide.
This routine separates quick after-session care from a deeper clean. Work on a stable surface, let every part cool, disconnect power and keep liquid away from the electronic base.
What you need
- Lint-free cloth or clean microfiber mat
- Cotton swabs and a soft small brush
- Warm water for manufacturer-approved glass parts
- Isopropyl alcohol only for parts the manual identifies as compatible
- Small containers for seals and removable pieces
- Fresh water for a final glass rinse
Do not improvise with sharp metal tools, household bleach, scented cleaners or abrasive pads. PubChem classifies isopropyl alcohol as a flammable liquid, so keep it away from heat, sparks and any device that is powered or charging. Use ventilation and follow the product label.
Step 1: power down and cool completely
Turn the rig off, unplug the charging cable and wait until the chamber and surrounding metal feel cool. A warm chamber can soften residue, but it can also burn skin and increase vapor from cleaning liquid. Never begin while the heater is active. Remove loose material only as directed by the manufacturer.
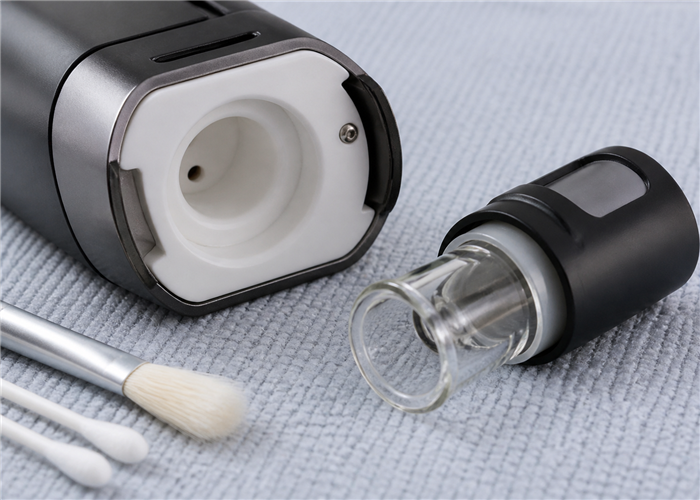
Step 2: photograph the assembly
Before disassembly, take a quick reference photo and note the order of glass, seals, caps and adapters. This simple step prevents forced reassembly. If a part resists gentle pressure, stop and check the manual; residue may have bonded two pieces together.
Step 3: separate electronics from washable parts
Create two zones on the mat. The dry zone holds the powered base, cable and any electronic chamber module. The wash zone holds only removable glass, approved seals and other non-electronic parts. This boundary is the most important rule in the process: never soak the base, charging port, display, battery section or wired chamber.
For the primary-source overview behind this point, read PubChem: isopropyl alcohol.
Step 4: clean the chamber carefully
Use a dry cotton swab first. Rotate it around the cooled chamber wall without pressing into air holes. If the manual permits alcohol, lightly dampen—not saturate—a fresh swab and wipe the surface. Follow with a dry swab. Ceramic coatings can chip or scratch, and quartz can crack after thermal shock, so avoid metal scraping and sudden temperature changes.
For chamber-material differences, see ceramic vs quartz heating chambers. A stain that does not affect airflow may be safer to leave than to attack with an abrasive tool.
Step 5: clean glass and the air path
Empty water before removing glass. Rinse manufacturer-approved glass with warm—not boiling—water. For persistent film, place only the removable glass in an appropriate container with a small amount of approved cleaning liquid, then rinse thoroughly. Do not expose hot glass to cold water. Inspect narrow joints for trapped residue and use a soft brush sized for the pathway.
The clearest official background is in FDA battery-fire prevention tips; check it before relying on an old forum answer.
Step 6: inspect seals and contact points
Wipe silicone seals with the method stated in the manual. Look for flattening, tears or stickiness. Clean electrical contacts with a dry swab unless the manufacturer specifies another method. A poor contact can resemble a chamber failure, while a damaged seal can create unwanted airflow.
Step 7: dry completely
Place washed parts on a lint-free mat with openings facing down. Allow enough time for hidden moisture to leave joints and internal channels. Do not accelerate drying with a flame, oven or high-heat dryer. The electronic base stays separate and dry. Reassembly should happen only when no water or cleaning-liquid odor remains.
Step 8: reassemble and perform a dry inspection
Return seals and parts in the original order without forcing threads or glass joints. Check that the chamber sits evenly, air holes are clear and glass is stable. Power on only after the complete assembly is dry. If the device reports an error, stop and verify contacts and compatibility rather than repeatedly activating it.
For the agency's current wording and diagrams, keep FDA electrical safety in regulated products with your device notes.
Quick-clean schedule
| When | Action |
|---|---|
| After each session | Cool, dry-swab accessible residue, wipe mouthpiece, inspect airflow |
| Every few sessions | Remove glass, clean approved pathway parts, inspect seals |
| When airflow changes | Stop use, inspect chamber holes and glass path before raising temperature |
| Before storage | Clean, dry, power off and pack parts securely |
| After a spill | Power off immediately and follow the manufacturer's service guidance |
Common cleaning mistakes
- Soaking the base: liquid and electronics must remain separate.
- Cleaning while hot: this risks burns, fumes and thermal shock.
- Using too much alcohol: a saturated swab can push liquid into air or electrical paths.
- Scraping coatings: damaged chamber surfaces may require replacement.
- Reassembling damp parts: hidden moisture can reach contacts and seals.
- Ignoring the manual: compatible materials differ between designs.
Product-specific planning
The Apex and I-MAGMA use different bodies and feature sets, so do not transfer disassembly steps from one model to another. Check the product instructions for removable glass, chamber type and approved cleaning liquid. Our rig vs dab pen comparison can also help you decide how much maintenance fits your routine.
When cleaning is not enough
Replace or service a part when you see cracked glass, damaged insulation, torn seals, a swollen battery housing, a loose charging port or a chamber error that remains after the approved contact-cleaning process. Do not use a damaged lithium-battery device. The FDA's battery-safety guidance recommends protecting devices from extreme temperatures and using charging equipment specified by the manufacturer.
Final checklist
- Device off, unplugged and cool
- Electronics separated from washable parts
- Chamber cleaned without sharp tools
- Glass rinsed and inspected
- Seals intact and correctly seated
- Every part completely dry
- Air path open before power-on
A repeatable light-clean routine is safer and easier than waiting for heavy buildup. Clean early, use only material-compatible methods and replace damaged parts instead of forcing them back into service.
A useful independent technical reference here is FDA ENDS overview.
The cleaning rule that prevents most mistakes
Decide what may get wet before opening the bottle. I put the powered base and cable on one side of the table and every manufacturer-approved washable part on the other. That physical gap is more dependable than trying to remember the boundary after a swab is already saturated. The Apex product page and I-MAGMA product page describe different bodies, so the same disassembly order should never be assumed for both.
Use the smallest amount of liquid that will do the job. A damp swab gives more control than pouring cleaner into a chamber. If you are unsure whether a white surface is solid ceramic or a coating, stop and check the manual; our ceramic and quartz chamber guide explains why aggressive scraping is a poor gamble.
How I handle a stubborn but otherwise intact chamber
First, let it cool. Next, make one dry pass to lift loose material. Then rotate a lightly dampened swab around the wall without pushing residue into an air hole. I give the cleaner time to work instead of adding force. A second dry swab should come away progressively cleaner. If the surface is chipped, cracked or lifting, cleaning is over; the part needs replacement or manufacturer advice.
A pen-sized chamber needs the same restraint. The P2 A pen and Spark make useful size references, but their current instructions—not a generic blog—must decide what can be removed or contacted with alcohol. For another wax-device layout, compare the LAVA wax vaporizer. These links are for model context; they are intentionally kept apart from the independent safety references below.
Glass is simple until temperature gets involved
Most removable glass looks robust right up to the moment it meets a sudden temperature change. I never move a hot part directly into cold water. Warm water, patient soaking when approved, and a brush that fits without wedging are a better combination. After rinsing, I hold the piece against a bright background and look through every bend for film or trapped lint.
When the safety details matter, go directly to CDC e-cigarette information.
The broad vaporizer maintenance guide covers burnt taste and airflow symptoms beyond e-rigs. Readers deciding whether this amount of care fits their routine can step back to the rig-versus-pen comparison. The full product collection is useful only after the cleaning and compatibility requirements are clear.
A practical drying test
Time alone is not proof that a part is dry. Look for droplets in joints, touch a clean tissue to low points, and smell for remaining cleaner. Glass can be placed opening-down on a lint-free mat; the electronic base stays upright and separate. I reassemble only after the hidden channels pass the same check as the visible surfaces.
Cleaning questions that deserve a straight answer
Can I soak the whole chamber?
Not unless the manufacturer explicitly identifies it as a fully removable, soak-safe part. Many chamber modules include electrical contacts or hidden heater components.
For travel or storage decisions, compare the product manual with CDC visual dictionary of device parts.
Should I clean immediately after a session?
Wait until the part is safe to touch. A light wipe while residue is still soft can be easier, but “warm” must never be confused with powered or hot.
What if airflow is still restricted?
Inspect each segment separately: mouthpiece, glass path, chamber holes and seals. Raising heat does not fix a physical blockage.
When should a part be replaced?
Cracked glass, chipped chamber surfaces, torn seals, damaged insulation and persistent electrical errors are replacement or service signals, not invitations to clean harder.
A complete deep-clean walkthrough
Lay a clean towel on a stable surface and place a small tray beside it for seals. Power the rig off, disconnect charging power, and wait until the chamber has returned to room temperature. Remove the glass with both hands close to the joint; pulling from the top creates leverage that can stress a narrow connection. Photograph the seal order if the assembly is unfamiliar.
The underlying material or component terminology is covered by U.S. Fire Administration battery guidance.
Empty water from the glass before carrying it across the room. If the manual permits warm-water rinsing, begin there. Rotate the piece so water reaches each bend, then drain it completely. For residue that remains, use only the cleaner and contact time allowed by the manufacturer. More liquid is not automatically more effective, and a sealed container should never be left where children or pets can reach it.
Turn to the chamber only after the glass is set aside. A dry swab is the first tool because it reveals how much material is loose. Work around the wall, then use a fresh swab for the base. If a lightly dampened swab is permitted, keep it away from electrical contacts and air openings. The goal is to lift residue, not push it deeper into the assembly.
Wipe the mating surfaces and inspect the seals under bright light. A seal that looks twisted can create an air leak even when it is not torn. Wash or wipe it according to the manual, then let it rest flat. Clean dry electrical contacts with a separate swab so residue from the chamber is not transferred onto them.
How long should drying take?
There is no honest universal number. Room temperature, humidity, joint shape and cleaning liquid all change the answer. I use evidence instead of a timer: no visible droplets, no cool damp feeling on a tissue, no cleaner odor, and no moisture emerging when the glass is rotated. If any one check fails, the part is not ready.
For a second check from a non-commercial source, use FAA lithium-battery baggage guidance.
Do not test dryness by powering the heater. Do not place parts in an oven, on a radiator or under a high-heat dryer. Those shortcuts can damage seals and create temperature stress in glass. Natural airflow on a clean mat is slower and far easier to control.
Troubleshooting after reassembly
If the rig shows a chamber error, turn it off again. Confirm that the chamber is the correct model, fully cooled, dry and seated evenly. Inspect clean contacts for lint. Do not keep tightening a threaded part past its normal stop. If the error remains, follow the manufacturer's service route.
If airflow is poor, remove and inspect one section at a time. Test the mouthpiece and glass path before blaming the chamber. A seal installed upside down or a small droplet in a narrow bend can mimic a larger blockage. If flavor remains off after the path is clean, review the chamber surface and operating setting rather than immediately repeating the entire wash.
Build a routine that you will actually keep
Store swabs, a soft brush, a small parts tray and the approved cleaner together. Replace dirty tools instead of returning them to the kit. A two-minute wipe after cooling prevents many deep cleans, while a scheduled inspection catches worn seals before they fail. The best routine is not the most elaborate one; it is the one that happens every time without bringing liquid near the base.
If regulations or recommendations have changed, FAA PackSafe battery FAQ is the page to recheck.
Small details that keep the next clean easier
Use white or light-colored swabs so residue is visible. Keep a separate brush for glass and another for dry chamber work. Date replacement seals when you open them, and discard a swab after one dirty pass rather than spreading material onto a clean surface.
Before storage, leave the device empty, cool, dry and powered off. Protect glass from side pressure and keep the cable from rubbing against it. Store cleaning liquid in its original labeled container, away from the device and away from children and pets.
One final source worth bookmarking is FDA ENDS technical application guidance.
Can compressed air speed the job?
It can force liquid or debris deeper into an air path and may damage delicate components. Use only a method specifically approved by the manufacturer.
What should a clean chamber smell like?
It should not retain a strong cleaner odor. If it does, continue airing the removable part and do not reassemble or heat it.
Keep a simple maintenance record
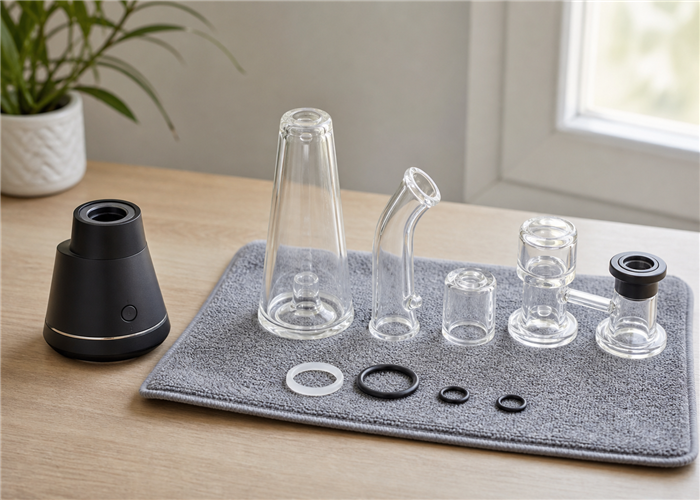
You do not need a spreadsheet. Note the date of a deep clean, the chamber or seal replaced, and any recurring error. If airflow becomes restricted at shorter intervals, that pattern can point to larger loads, a damaged seal or a part that is nearing replacement. A record also helps support staff distinguish a one-time cleaning problem from a repeatable hardware fault.
Use the same record for the battery. Charging that suddenly takes much longer, a housing that feels unusually hot, swelling, odor or visible damage are reasons to stop using the device. Do not continue testing a suspect lithium-battery product. Move away from flammable materials and follow the manufacturer's support and disposal instructions.
What a finished clean should look like
The glass path is visibly open, the chamber has no loose material, seals sit flat, contacts are clean and dry, and the base has never been exposed to liquid. There is no cleaner odor. Parts fit without force. The device remains powered off until assembly is complete. That is a far better finish line than chasing a perfectly white chamber with increasingly aggressive tools.
Cleaning is one part of the routine; the electric dab rig ownership guide also covers format, temperature controls, replacement parts, charging and storage.