
Electric Dab Rig Guide: Choose, Use, Clean and Compare
Start with the routine, not the feature list
An electric dab rig is easiest to choose when the ordinary week is treated as the test. Decide where the hot glass will cool, how often the chamber will be wiped, which outlet will be used for charging, and whether the device must travel. Those practical limits sort the field faster than a long list of modes. A larger base may be comfortable on a dedicated desk, while a compact body may earn its place in a small apartment or shared storage cabinet. For the broad regulatory and product-safety context, keep the FDA overview of electronic vaping systems.
The first fork is format. A tabletop rig gives glass, controls and removable parts more room, but it also asks for a stable surface and a case that protects fragile pieces. A pen slips into a smaller kit, although its narrow chamber and short air path can collect residue quickly. Neither is automatically simpler. One concentrates the work into visible pieces; the other compresses the same responsibilities into a smaller space where neglect is harder to see. If format is still undecided, begin with our electric dab rig versus dab pen comparison.
Before comparing temperature numbers, inspect what the manufacturer actually specifies. Look for supported materials, chamber construction, included glass, charging input, lockout behavior and replacement parts. A connector that physically fits does not prove electrical or thermal compatibility. The manual should settle that question. When documentation is vague, treat the uncertainty as part of the cost rather than assuming an adapter will solve it later.
The device is a system, not a single heater. The base supplies power and controls, the chamber receives material, the glass or mouthpiece shapes the air path, and seals keep those paths aligned. A problem in any one piece can imitate a problem elsewhere. Weak airflow may come from residue in glass, a shifted seal or a blocked chamber opening. An error message may be a contact issue rather than a failed battery. The simplest independent component overview is the CDC explanation of device components and aerosol.
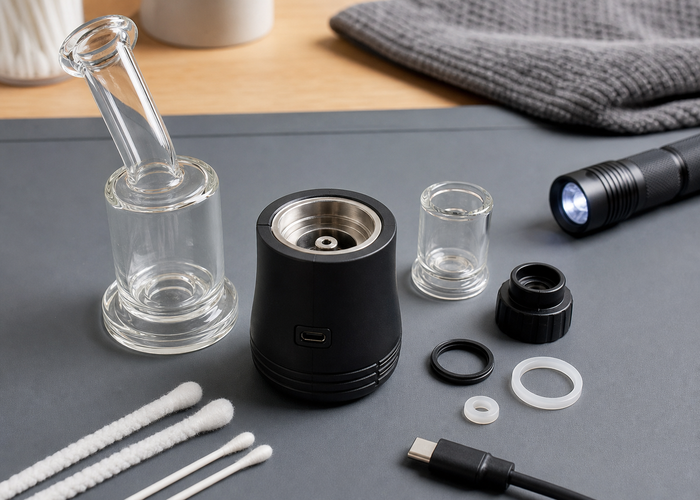
How an electric dab rig is organized
Start an inspection with the device powered off, cooled and empty. Separate only the parts the manual identifies as removable. Place the electronic base away from any liquid, then arrange glass, chamber and seals in the order they came off. This small habit prevents a wet part from wandering back toward the charging port and makes it obvious when a gasket has been omitted during reassembly. A current tabletop reference point is the Apex e-rig.
Chamber access deserves more attention than chamber marketing. A deep, narrow cup may be awkward to wipe even if its material sounds premium. An integrated module may protect the heater but cost more to replace. A removable cup can be easy to inspect, yet the contacts beneath it must remain clean and dry. The useful question is not merely ceramic or quartz; it is whether the whole assembly can be maintained without improvisation.
Temperature control should be read as a promise that needs context. A displayed setting may represent a sensor location, a control target or a preset band rather than the exact temperature at every point on the chamber wall. Load size, airflow, residue and heater geometry change the result. Begin at the lowest manufacturer-recommended setting that does the job, and change one variable at a time instead of chasing a dramatic first session. For evidence that control method and actual heater temperature can diverge, review the published infrared-thermography study of heater temperatures.
Fast heat-up can be convenient, but it shortens the moment in which a user notices an overfilled chamber or an aggressive setting. Slower response can feel calmer, although a heavier chamber may retain heat after power stops. The cooldown is part of the session. If the device cannot be left safely untouched for that period, the location is wrong regardless of how attractive the warm-up specification looks. For a modular table-format example, inspect the I-MAGMA 2-in-1.
Temperature control without the slogans
The control interface matters at night, in bright rooms and when hands are busy. Check whether the selected level is unmistakable, whether the button can be locked, and whether the device signals an error without relying on a tiny color change. A control that looks elegant in a product photo may be frustrating when several modes share the same light. Clear feedback is a safety and maintenance feature, not decoration.
Voltage, heater resistance and control logic interact, so one headline number cannot describe the thermal system. This is why identical-looking bodies can behave differently and why third-party modules should never be assumed safe. If a replacement chamber is offered, match the exact device generation and part number. Threads and contacts must align without force, and the rated combination should be documented by the manufacturer. Material names alone do not settle thermal behavior; the public-health study of heating-element materials.
Glass changes the ownership routine more than many buyers expect. It makes residue and water level visible, can separate the mouth from the heated chamber, and usually needs a protected place to dry. It also introduces breakage risk and hidden bends. Hold replacement cost beside the device price. A rig that depends on unusual glass can be expensive to keep running even when the electronic base remains sound. For a deeper chamber-material discussion, use the ceramic versus quartz chamber guide.
Portability is not just weight. Count the base, glass, cable, chamber cap, seals, swabs and case. Then imagine the kit after a session, when some pieces are still warm or need cleaning. A genuinely portable setup keeps clean and used parts apart and prevents accidental activation. If the case has no safe place for the glass or warm chamber, the small base has not solved the travel problem.
Quick ownership comparison
| Decision | What to inspect | Why it matters later |
|---|---|---|
| Format | Base size, glass protection, lockout and carrying case | The device must fit the place where it will actually cool and be cleaned. |
| Chamber | Construction, air holes, removal method and replacement cost | Access determines whether residue is managed early or ignored until performance falls. |
| Power | Specified charger, cable, lockout and battery condition | Capacity is useful only when charging behavior and heater demand also fit the routine. |
| Support | Manual, seals, glass, chamber and warranty route | Unavailable parts can turn a minor breakage into a complete replacement. |
A buying comparison that survives the first month
Buying is easier when four costs are written down: the device, one replacement chamber, one replacement glass piece and the cleaning kit. Add the time required for a quick wipe and a deeper clean. A cheaper body with unavailable parts can be the expensive choice, while a more substantial device with clear support may cost less over a year. Do not assume every consumable remains available simply because the model is new. A useful checklist of design and electrical questions appears in the FDA technical guidance for ENDS applications.
Warranty language should be read before residue reaches the device. Check which parts are treated as consumables, what damage is excluded, whether proof of purchase is required and how support handles a persistent error. Save a copy of the manual and product page. Listings change, and the document that explained the original charger or compatible chamber may be difficult to locate months later. A compact ownership contrast is the P2 A concentrate pen.
The best model comparison uses the same questions for every candidate. What material does it support? How is the chamber removed? Where are the air holes? Can the device be locked? What charger is specified? Are glass, seals and chambers available? How long must it cool before cleaning? A table built from those answers is more honest than one that compares only battery capacity and the number of temperature presets.
Retailers and wholesale buyers should ask the same questions at a larger scale. A modular product needs accurate accessory mapping, labeled generations and replacement inventory. Similar-looking chambers should not share a compatibility claim unless documentation supports it. Returns often begin with a vague product page. Clear photographs of the actual connector, chamber and included parts can prevent that confusion before it becomes a support ticket. The reason damaged or unknown hardware deserves caution is illustrated by this peer-reviewed analysis of metals in vaporizer aerosols.
Chamber, glass and airflow care
Cleaning begins before the residue hardens. Once the chamber is cool enough to handle and the device is off, a dry swab can lift loose material. Use liquid only where the manufacturer allows it, and use the smallest controlled amount. Never pour cleaner toward an integrated heater or air hole. A bright side light often reveals film and chipped surfaces better than aggressive scraping ever will. The full care sequence is in our step-by-step electric dab rig cleaning guide.
Glass should cool naturally before it meets rinse water or cleaner. Sudden temperature change can stress glass and the joints that hold it. When soaking is allowed, soak only the removable glass, not the electronic base or a powered chamber module. After rinsing, inspect every bend against a bright background and let the piece dry with openings positioned so trapped droplets can escape.
Seals are small enough to lose and important enough to stop a session. Examine them for flat spots, tears, stretching and residue in their grooves. A seal should sit without being twisted or compressed by force. Keep spares in a labeled bag for the exact model. A ring that looks close in diameter can still change the air path or keep glass from seating correctly. For charging and battery-handling basics, follow the FDA battery-fire prevention guidance.
Reassembly is a dry process. Touch a clean tissue to low points in glass, smell for remaining cleaner, and inspect contacts for lint. Parts should seat at their normal stop without extra torque. If the device reports an error, power it off and separate the assembly again. Repeated tightening is not diagnosis; it can damage threads, distort a seal or push residue into a contact area. For symptoms that extend beyond an e-rig, continue with the burnt-taste and maintenance guide.
Battery, charging and travel
Lithium-battery behavior belongs in the inspection routine. Stop using a device with swelling, unusual heat, impact damage, odor or a charging pattern that has changed sharply. Use the specified charger and cable on a clean, hard surface where the device remains visible. A couch, bed or closed case traps heat and hides early signs of trouble. Charging should never be the part of ownership that happens unattended by default.
Battery capacity is often presented as freedom, yet larger capacity adds weight and may lengthen charging. Compare capacity with heater demand, session length and the availability of safe charging time. A modest battery that reliably covers the intended routine can be the better fit. Do not mix loose cells, use damaged wraps or substitute a charger simply because the connector appears to fit. Broader household battery precautions are summarized by the U.S. Fire Administration lithium-ion battery guidance.
For travel, separate airline rules from everyday portability. Spare lithium batteries and battery-powered devices have specific packing requirements, and rules can change. Prevent accidental activation, protect terminals and keep glass from side pressure. A case should organize parts rather than merely hold them. Never pack a warm or recently used device into a sealed compartment just to meet a departure time. Another portable wax-device reference is the LAVA wax vaporizer.
Storage at home should be equally deliberate. The device belongs powered off, empty, cool and dry, away from children, pets, direct sun and flammable materials. Glass should not carry the weight of cables or tools. Cleaning liquid stays in its original labeled container, separate from the device. A small tray for seals and caps is inexpensive insurance against the missing part that otherwise appears during the next session.
Troubleshooting without forcing parts
Troubleshooting starts by naming the symptom precisely. “It does not work” can mean no power, no heater response, weak airflow, an error code, poor flavor or leaking. Test only one section at a time. Confirm charge and lockout first, then the correct chamber, clean contacts, clear air path and properly seated seals. Stop when damage, overheating or an undocumented combination enters the picture. Travel planning should be checked against the current FAA PackSafe battery guidance.
A chamber error after cleaning often points to moisture, lint, incorrect seating or a mismatched module. Let every part dry longer than seems necessary, then inspect the contact area under strong light. Do not use metal tools on contacts and do not keep cycling power to see whether the warning disappears. Persistent errors belong with the manufacturer's service route, not an improvised bridge or extra force. For the heater, contact and airflow vocabulary, read the atomizer fundamentals guide.
Weak airflow is usually easier to isolate. Remove the mouthpiece or glass and inspect it separately, then check the chamber openings and seal orientation. A droplet in a narrow bend can feel like a solid blockage. Higher heat will not clear a physical obstruction and may cook residue onto the chamber. Restore the path while everything is cool, then reassemble without compressing seals beyond their normal position.
Leaks deserve the same patience. Identify whether the material came from an overfilled chamber, a tilted warm device, a damaged seal or an unsupported attachment. Clean the path before testing again with a modest load. If liquid or residue has reached the electronic base, stop. The correct response is service guidance, not continued heating in the hope that the device dries itself. When unfamiliar part names cause confusion, the CDC visual dictionary of vaping-device parts.
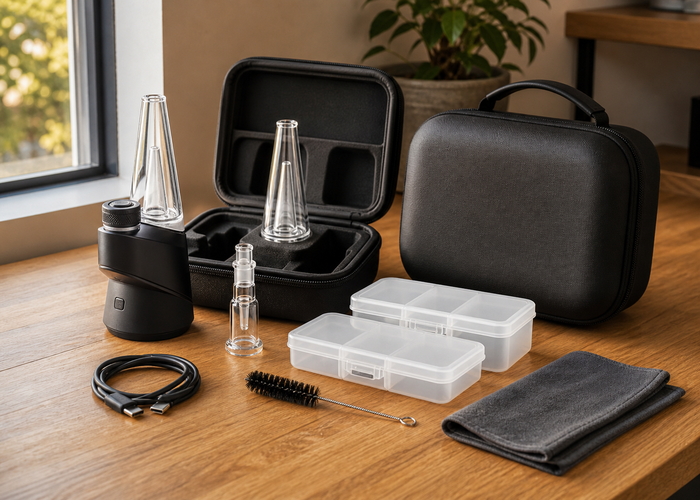
A durable ownership decision
The later ownership check is simple: can the device still be cleaned, stored, charged and explained without shortcuts? If replacement parts have vanished, the manual is unclear or the routine keeps putting liquid near electronics, the fit is poor even when performance seems impressive. A reliable setup is one whose maintenance remains boring. That is a compliment, because predictable care keeps small issues from turning into expensive failures. After the routine is clear, compare the available models in the BT Vapor product collection.
Keep a short record of deep cleans, replacement parts and recurring errors. A note on the date and symptom is enough. If airflow problems return sooner each time, the pattern may point to load size, a worn seal or a narrowing path. If charging takes much longer or the housing feels warmer, the history gives support staff something more useful than a vague description.
The final decision should be easy to defend in plain language: this format fits the available space; the chamber can be inspected; the glass can be protected; the charger is specified; and replacement parts exist. If several models pass, choose the one with the clearest support and the least awkward cleaning step. A feature that complicates every session is not an upgrade simply because it adds another mode.